

Showing posts with label DIY. Show all posts
Showing posts with label DIY. Show all posts
Tuesday, May 5, 2015
DIY: Donut Sunglasses
Saturday, March 21, 2015
Gekleurde haren met pastelkrijt

Ik wilde jullie even laten zien waar ik afgelopen woensdag druk mee bezig ben geweest. Al maandenlang zit ik te dromen over gekleurde plukken in mijn haar en ik dácht een goede, goedkope oplossing te hebben gevonden. Kennen jullie het fenomeen hair chalk? Ik ben er fan van!
Friday, March 6, 2015
DIY: 90s sweater

Een tijdje terug zag ik op Pinterest dit shirt en ik vond hem zo leuk! Ik wilde mijn grijze trui nog steeds omtoveren tot mijn nieuwste DIY projectje en de math was done. Het was al de beste sweater ooit, maar met zijn subtiele printje vind ik hem stiekem nog net íets leuker. En dat terwijl het super simpel was om te doen! Ik ben een sucker voor makkelijke DIY projectjes. Deze maakt me stiekem best een beetje trots.
Sunday, December 14, 2014
Kerstcadeaus om zelf te maken
 |  |
Nog maar twee weekjes en dan is het alweer Kerst! De straten zijn inmiddels weer verlicht met duizenden lampjes, er worden steeds vaker kerstliedjes gedraaid op de radio en de banksaldo's worden steeds lager. Of in ieder geval, mijn banksaldo. Ik weet niet hoe het bij jullie zit, maar bij mij gaat het richting het nulpunt, haha. Oh, het harde leven van een student. Of zou dat ook zo zijn als je niet meer studeert?
In ieder geval kan ik wel wat budget kerstcadeaus gebruiken. En vaak is het zelf maken van kerstcadeaus de goedkoopste optie! Met wat spraypaint kun je vintage beeldjes bijvoorbeeld een nieuwe, moderne look geven. Maar natuurlijk zijn er nog veel meer leuke cadeautjes die je zelf kunt maken! Vandaag kun je hier wat fijne inspiratie vinden!
Monday, April 21, 2014
DIY: beaded bracelet

Hoe verander je een absoluut niet productief dagje in een toch best een beetje productief dagje? Men neme wat kralen die al sinds vorige zomer in de kast lagen, een heel leuk nagellakje en slechts een minibeetje motivatie. Die stijgt vanzelf als je lekker bezig bent!
Friday, December 20, 2013
DIY Ugly Christmas Sweater
Hurray for Christmas holidays!! I spent my week studying and making tests, and now I'm hoping I did well. I think I did one good, one bad and one I don't really know. So let's hope for the best! Now it's time for a holiday and hopefully good times, happy times, happy people and nice food ;-) . I went shopping today for the last Christmas gifts and I'm officially broke now. You don't really understand about December being the most expensive month of the year until you've got to pay rent and until you've got to buy gifts for everyone in your family, including a girlfriend and a mother in law. But all that matters is the happy face when you give your gift, right?
I made a couple of gifts myself. I asked you on my Twitter page how I should do it with the DIYs for my blog. If I posted them before Christmas, everyone would see what they would get.. But Rinske came with the solution: just give them now and post the DIYs later. So I'll be posting some DIYs after Christmas or I'll change them a bit so they can be Valentine's day gifts, or just simply spring gifts or whatever!
I spent yesterday making myself an ugly Christmas sweater. They used to be just ugly, now they're totally fashionable. So as a fashion blogger, I can't stay behind and just had to have my own Christmas sweater! Due to the expensive December month, I decided to make it myself. And it was actually quite cheap and nice to do!
Dutch: Hoera, Kerstvakantie!! Afgelopen week was ik druk met leren en tentamens maken. Ik had er drie, waarvan er één wel goed ging, één minder en één weet ik niet zo goed. Nu is het dus afwachten tot de cijfers binnenkomen. Eerst ga ik lekker genieten van mijn vakantie, met hopelijk fijne tijden en lekker eten. Vandaag heb ik mijn laatste kerstinkopen gedaan en nu ben ik helemaal blut. Je weet pas echt wat mensen bedoelen met "december is de duurste maand" als je op jezelf woont, huur moet betalen en voor je familie én vriendin en schoonmoeder leuke cadeautjes moet kopen. Maar het gaat toch om het blije gezicht van de krijger, toch? ;-)
Ik heb een aantal cadeautjes dit jaar zelfgemaakt. Op Twitter vroeg ik jullie hoe ik dat moest doen met de uitleg voor op mijn blog. Rinske, mijn vriendin, kwam toen met de oplossing: gewoon later de DIY plaatsen. Eigenlijk heel simpel! Ik kan dan wachten tot volgend jaar, of de DIYs iets aanpassen zodat ze goed zijn voor Valentijn of simpelweg de lente.
 What you'll need:
- A sweater (I bought mine in sale for only €10,00 at H&M)
- Felt
- Needle and thread
- Some pompoms and small bells, depending on what you want to make
- White paper and a pen (or a template of something Christmas related, like Santa Claus)
I made a couple of gifts myself. I asked you on my Twitter page how I should do it with the DIYs for my blog. If I posted them before Christmas, everyone would see what they would get.. But Rinske came with the solution: just give them now and post the DIYs later. So I'll be posting some DIYs after Christmas or I'll change them a bit so they can be Valentine's day gifts, or just simply spring gifts or whatever!
I spent yesterday making myself an ugly Christmas sweater. They used to be just ugly, now they're totally fashionable. So as a fashion blogger, I can't stay behind and just had to have my own Christmas sweater! Due to the expensive December month, I decided to make it myself. And it was actually quite cheap and nice to do!
Dutch: Hoera, Kerstvakantie!! Afgelopen week was ik druk met leren en tentamens maken. Ik had er drie, waarvan er één wel goed ging, één minder en één weet ik niet zo goed. Nu is het dus afwachten tot de cijfers binnenkomen. Eerst ga ik lekker genieten van mijn vakantie, met hopelijk fijne tijden en lekker eten. Vandaag heb ik mijn laatste kerstinkopen gedaan en nu ben ik helemaal blut. Je weet pas echt wat mensen bedoelen met "december is de duurste maand" als je op jezelf woont, huur moet betalen en voor je familie én vriendin en schoonmoeder leuke cadeautjes moet kopen. Maar het gaat toch om het blije gezicht van de krijger, toch? ;-)
Ik heb een aantal cadeautjes dit jaar zelfgemaakt. Op Twitter vroeg ik jullie hoe ik dat moest doen met de uitleg voor op mijn blog. Rinske, mijn vriendin, kwam toen met de oplossing: gewoon later de DIY plaatsen. Eigenlijk heel simpel! Ik kan dan wachten tot volgend jaar, of de DIYs iets aanpassen zodat ze goed zijn voor Valentijn of simpelweg de lente.

- A sweater (I bought mine in sale for only €10,00 at H&M)
- Felt
- Needle and thread
- Some pompoms and small bells, depending on what you want to make
- White paper and a pen (or a template of something Christmas related, like Santa Claus)
Wednesday, December 4, 2013
DIY Christmas gifts: robot cushion

English: Christmas is getting closer and closer. As a student, I know very well what it's like to stress about the fact that you don't have enough money to get amazing presents for everyone. Well, here's the solution: DIY presents! Most of the time, it's cheaper, more fun to buy/do and it can also be more personal! You can adjust it to everyone's personal wishes. And that's why I'm presenting you this cushion DIY, shaped like something you love. In my case: robots.
Dutch: Kerst komt steeds dichterbij en als student weet ik als geen ander hoe dit op je zenuwen kan werken: ik heb bij lange na niet genoeg geld om voor iedereen wat moois te kopen. Daar heb ik nu een oplossing voor gevonden: DIY cadeautjes! Het is vaak goedkoper om je eigen cadeaus te maken, het is vaak veel leuker en het is ook nog eens persoonlijker! Je kunt het volledig aanpassen aan ieders wensen. Daarom geef ik jullie vandaag wat instructies voor een DIY kussentje, in de vorm van iets waar je van houdt. In mijn geval: robots.
Tuesday, November 5, 2013
DIY embellished flower sunglasses

Floral sunglasses. I came across some pairs on Instagram a while ago, and ever since that moment, I haven't stopped thinking about doing a DIY on them. So I took some time, some glue, some glasses and some flowers to try and get some happy glasses.
Why make some sunglasses now, when fall has started over a month ago? Well, this is the time when the sun isn't that high in the sky, but it still shines quite bright. So when driving, or riding your bike, or walking on the street, you're sometimes blinded by the sunlight, especcially later in the afternoon. And that's why you really need sunglasses now: to prevent accidents from happening (I may have exaggerated that a little bit, but I bet it happens with car drivers).
Want to know how my happy glasses turned out, and how I did it?
Tuesday, July 9, 2013
DIY Eye Espadrilles
Before I went to France, I was home alone for one week. And besides partying like hell (no, just joking) I did a lots and lots of DIYs or I made some plans for DIYs. I saw a picture of Sabrina from AfterDRK on her Instagram feed wearing espadrilles with eyes printed on them, and I instantly fell in love with this creative idea! And when I saw some espadrilles in store for only €5,99 (!) I realised this was meant to be (oh, how emotional), and I bought the espadrilles and some paint.
Here's what you'll need
- Espadrilles (bought mine at Blokker)
- Shoelace
- Fabric paint
- Paint brush
- Paper and a pen
 Step 1. Tie the lace around your espadrille to make the surface you want to paint flat. This will make it easier to apply the fabric paint to the shoe.
Not on the pics, but also a step that helped me a lot: I painted an eye on a piece of paper before I started drawing it on the shoe. This way it was easier for me to get two eyes of the same size. All I had to do for the second, closed eye, was just turn the paper around and there was my second, perfectly sized and shaped, eye!
 Step 2. Start painting the eye on the shoe. At first I wanted to use black fabric paint to give the eye a pupil, but then I figured that I could give it a real touch of "me" if I didn't draw a pupil on it. So I just drew the eye, the iris, and the eyelashes and then went on to the other eye! Be careful with the first eye: you definitely don't want your eyelashes to go the wrong way!! This is what happened to me. To fix it, I used a bit of Biotex. Thank god for Biotex!!
 Step 3. Draw the second eye on the shoes. This eye is closed for the wink, so you don't have to draw an iris in it! Just draw some eyelashes on the bottom of the eye and you're all done!
 Step 4. Wear them with pride! I think the striped side of the espadrille gives another nice touch to it. When I bought my espadrilles, at first I was really happy with them, but then I thought: "oh no, I'm so so stupid!! I just bought black shoes and I have to draw the eye on it with black paint. Then I thought: why do i have to do that? Can't I just get another color for the outline? At the craft shop it all worked out fine: the golden paint caught my eye, they had only one pot of it left, and it was perfect!! Do you like the golden outline, or would you prefer lighter shoes with a black outline of the eye?
Are you gonna try this yourselves?
♥ Saskia
FOLLOW ME ON: BLOGLOVIN | GOOGLE PLUS | TWITTER | LOOKBOOK | INSTAGRAM | STYLIGHT
Here's what you'll need
- Espadrilles (bought mine at Blokker)
- Shoelace
- Fabric paint
- Paint brush
- Paper and a pen

Not on the pics, but also a step that helped me a lot: I painted an eye on a piece of paper before I started drawing it on the shoe. This way it was easier for me to get two eyes of the same size. All I had to do for the second, closed eye, was just turn the paper around and there was my second, perfectly sized and shaped, eye!


Are you gonna try this yourselves?
♥ Saskia
FOLLOW ME ON: BLOGLOVIN | GOOGLE PLUS | TWITTER | LOOKBOOK | INSTAGRAM | STYLIGHT
Wednesday, July 3, 2013
DIY Marc Jacobs Pave Necklace
Here's another DIY I've been wanting to do for quite some time now. I saw it once on Modestelle and fell in love with the simplicity of the idea, but also the amazing look of a pave on a necklace. So thank you Modestelle and Marc Jacobs for this idea! :-)
 What you'll need
- A hardware nut
- Rhinestones
- Jewelery glue
- Jewelery pliers
- Tweezers
- Necklace chain
- Lobster clasp and jump ring
 Step 1. Put glue on the nut. Be careful: jewelery glue can come out of the tube very easily!!
 Step 2. Put a little bit of glue on the hardware nut for each rhinestone you put on it. I used very small stones, so I had to use tweezers to put them on the right way.
 Step 3. Repeat, repeat, repeat until the entire nut is full of rhinestones! Then let it dry for a bit. While you let it dry, you can watch TV, or you can already move on to step 4, where you'll attach the lobster clasp and jump ring to the end of the necklace chains!
 Step 4. Cut the chain in half and put a lobster clasp on one of the ends (using the jewelery pliers) and a jump ring on the other half.
 Step 5. Thread the chain through the nut and attach the loose end to the chain. This will make the front of your nut really be showing on your necklace. If you just put the necklace through the nut, it'll turn a quarter and the front will not be in the front. This sounds a bit stupid, but you'll just have to try it to understand it haha!
Thread the other half of the necklace through the nut the same way. Make sure they are attached at the same height, to make it look symmetric.
 And here's the result!
I Always have a hard time doing these DIY's in English haha, it's still a bit hard to explain exactly what I did, and make it sound understandable... But if you have any questions about this, please ask and I'll try to answer in a more understandable way! ;-)
By the way: I didn't really do this myself. I took the pictures while my girlfriend did the crafting. I have stupid eyes that won't let me see very good, especially depth, so using tweezers, jewelery pliers and doing some very precise work isn't really my cup of tea. I really love the result of this necklace, and I'd love to know what you think about it!!
♥ Saskia
FOLLOW ME ON: BLOGLOVIN | GOOGLE PLUS | TWITTER | LOOKBOOK | INSTAGRAM | STYLIGHT

- A hardware nut
- Rhinestones
- Jewelery glue
- Jewelery pliers
- Tweezers
- Necklace chain
- Lobster clasp and jump ring


Thread the other half of the necklace through the nut the same way. Make sure they are attached at the same height, to make it look symmetric.

I Always have a hard time doing these DIY's in English haha, it's still a bit hard to explain exactly what I did, and make it sound understandable... But if you have any questions about this, please ask and I'll try to answer in a more understandable way! ;-)
By the way: I didn't really do this myself. I took the pictures while my girlfriend did the crafting. I have stupid eyes that won't let me see very good, especially depth, so using tweezers, jewelery pliers and doing some very precise work isn't really my cup of tea. I really love the result of this necklace, and I'd love to know what you think about it!!
♥ Saskia
FOLLOW ME ON: BLOGLOVIN | GOOGLE PLUS | TWITTER | LOOKBOOK | INSTAGRAM | STYLIGHT
Monday, June 17, 2013
DIY Neon Flowerpot
Here's another DIY project I found while browsing through other blogs lately! I found this one on My Online Wardrobe! It's not a fashion DIY for once, but an interior DIY! I decided to do it exactly the same as on My Online Wardrobe, but next time I might put an aztec print on the neon pink part of the pot! Well, here we go!
Here's what you'll need
- A flowerpot (I bought mine for less than €2,00 at Action)
- Neon spraypaint (bought this one at a hardware store)
- Newspapers to cover your floor
- Tape
- Pieces of paper
- Nailpolish remover
- Cotton swabs
And here's what you'll do!
 Step 1. Cover the top part of your flowerpot with tape. I also used some white paper to cover it up faster, and I also thought it would stop spots and splashes to appear on the pot. We'll see soon if that worked or not...
 Step 2. Start spraying your flowerpot! It's best to spray multiple thin layers on it, as this will prevent drips.
 Step 3. Let it dry for a bit! You can use the tip of your finger to feel whether it's dry or not, but make sure to do this very carefully! If it's not dry, you will see your finger marks on the paint haha! ;-) If it's completely dry, peel off the paper and the tape! I still had some splashes, but they were easily to remove with a bit of nailpolish and a cotton swab.
 And here's your result!! Put a nice plant in it, and enjoy!
How did you like this DIY? Would you like some more interior DIY's on my blog, or would you like me to stay with fashion DIY's? I've still got the "big book of DIY" on my computer, with projects I collected over the time, so don't worry: DIY's will always find their way back to my blog! :-)
♥ Saskia
FOLLOW ME ON: TWITTER | LOOKBOOK | BLOGLOVIN | INSTAGRAM | STYLIGHT
Here's what you'll need
- A flowerpot (I bought mine for less than €2,00 at Action)
- Neon spraypaint (bought this one at a hardware store)
- Newspapers to cover your floor
- Tape
- Pieces of paper
- Nailpolish remover
- Cotton swabs
And here's what you'll do!


How did you like this DIY? Would you like some more interior DIY's on my blog, or would you like me to stay with fashion DIY's? I've still got the "big book of DIY" on my computer, with projects I collected over the time, so don't worry: DIY's will always find their way back to my blog! :-)
♥ Saskia
FOLLOW ME ON: TWITTER | LOOKBOOK | BLOGLOVIN | INSTAGRAM | STYLIGHT
Friday, June 7, 2013
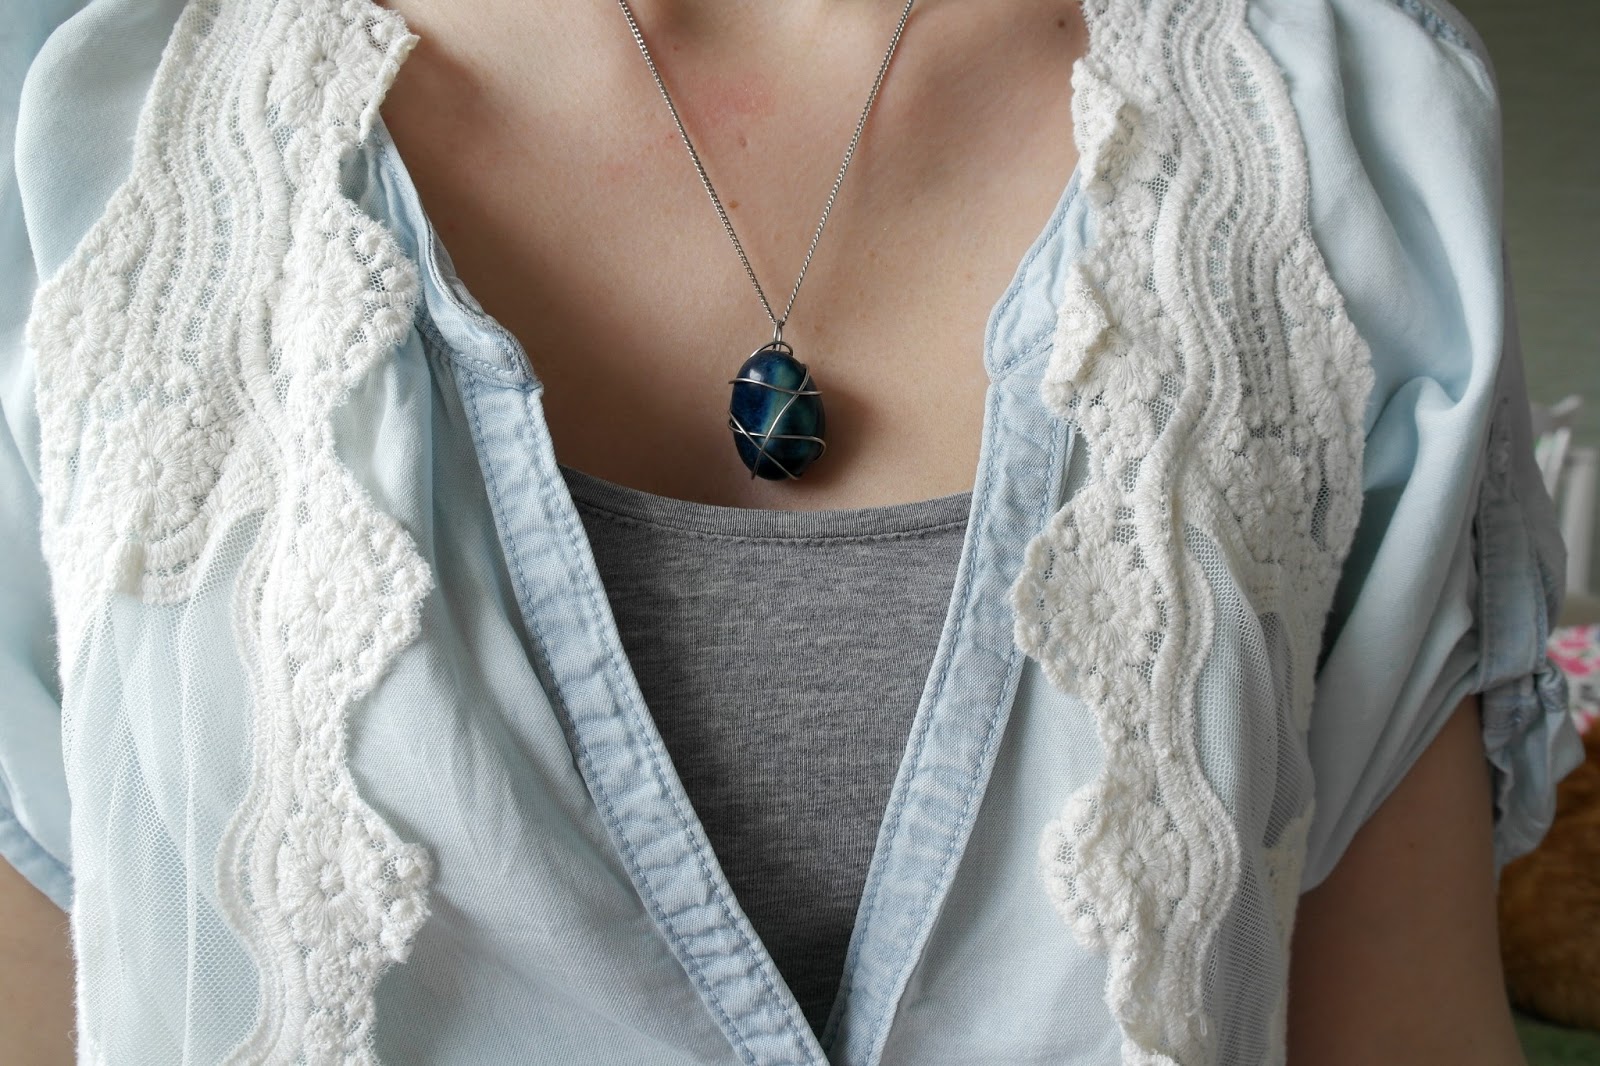
DIY stone necklace
Here's another DIY post me and Rinske tried out some time ago. I saw this DIY once on the German blog Mia's Little Corner, but unfortunately I couldn't find it anymore. Luckily I keep all of the DIY's that inspire me (with a link, but this time it didn't work anymore.. Bummer!) in a huge document on my laptop. I put some pictures with it, and the description of how I should do this with it, and then I save it for when I've got time.
Enough about that, let's go DIY!
What you'll need
- Some stones
- Wire
- Necklace chains
- Jewellery craft pliers
What you'll do

First, cut a piece of wire of which you think it will be long enough, then make a loop in the middel of the wire. Twist it to secore the loop.

Then you have to wrap the wire around the stone for the first time. Make sure you wrap it around very tightly, so the stone won't fall out.

Then just start wrapping the stone in wire, the way you like it to be. Again: make sure it's wrapped around the stone tightly. Also make sure you cover each angle of the stone, so there's no way it can fall out!
.JPG)
Cut the loose ends of the wire. The back of your pendant looks quite chaotic, but that's OK. People will only see the front of it, right? ;-)
And here are the results!! On the first pic, you'll see the result of my stone necklace, and on the second you'll see Rinske's result!


Do you like this DIY? And will you be trying it yourself? Or have you already made one? I'd love to see your result! There's also an option which is perfect for your summer holiday. You can check this DIY out right here. It's pretty much the same idea, but then with beach stones! So first you're gonna have to spend an afternoon on the beach, relaxing in the sun and finding some pretty stones, and then after this day, you can make this necklace to remind you of that perfect beach day!
Does this sound good, or does it sound perfect?
♥ Saskia
FOLLOW ME ON: TWITTER | LOOKBOOK | BLOGLOVIN | INSTAGRAM | STYLIGHT
Enough about that, let's go DIY!
What you'll need
- Some stones
- Wire
- Necklace chains
- Jewellery craft pliers
What you'll do

First, cut a piece of wire of which you think it will be long enough, then make a loop in the middel of the wire. Twist it to secore the loop.

Then you have to wrap the wire around the stone for the first time. Make sure you wrap it around very tightly, so the stone won't fall out.

Then just start wrapping the stone in wire, the way you like it to be. Again: make sure it's wrapped around the stone tightly. Also make sure you cover each angle of the stone, so there's no way it can fall out!
.JPG)
Cut the loose ends of the wire. The back of your pendant looks quite chaotic, but that's OK. People will only see the front of it, right? ;-)
And here are the results!! On the first pic, you'll see the result of my stone necklace, and on the second you'll see Rinske's result!

Do you like this DIY? And will you be trying it yourself? Or have you already made one? I'd love to see your result! There's also an option which is perfect for your summer holiday. You can check this DIY out right here. It's pretty much the same idea, but then with beach stones! So first you're gonna have to spend an afternoon on the beach, relaxing in the sun and finding some pretty stones, and then after this day, you can make this necklace to remind you of that perfect beach day!
Does this sound good, or does it sound perfect?
♥ Saskia
FOLLOW ME ON: TWITTER | LOOKBOOK | BLOGLOVIN | INSTAGRAM | STYLIGHT
Monday, April 8, 2013
DIY beaded heels
Hi guys!
A couple of months ago I stumbeled upon this DIY for the Burberry beaded heels from the resort collection of 2012 (check out the original heels here). I immediately fell in love, but didn't have the supplies so I decided to put them in my so called "big book of DIY". I really recommend you all to create such a thing for yourselves. Just open a word document and put all the DIYs that inspire you in it. Don't forget to put the link with it, so you'll never forget where you got the DIY from. It's a great way to save DIYs for the future!
A week or so ago I got some beads from my girlfriend Rinske and a couple of days after that I started on my heels. Here are the pics and steps I took!

What you'll need:
- Heels
- Beads (pick any color you like)
- Thread (you can see a gold kind of thread on the pic, but I ended up using black!)
- Scissors

Step 1.
Tie the thread around the shoe. With the shoe I used it was quite easy to find a pretty place to tie my thread around. I put the tie underneath the strap to cover everything up nicely. After this, just start stringing the beads until the thread is full. Attach the thread the same way on the other side of the shoe when you're finished.
Tip: you can measure the lenght of your thread by first attaching the thread to the shoe. I followed the steps from A Pair & a Spare first, making my threads only 15cm, but they were way too short. So make sure your thread is long enough to go from side to side before you cut it ;-)!

Step 2.
Tie the second thread around the first one, and then start stringing your beads again. Do the same on the other side of the shoe when you're finished.

Step 3.
When you've finished stringing your beads and when you've got everything attached to the shoe, cut away the loose threads. This will give your shoe a nice finishing touch.

Et voilà!
Your shoes are finished!
What do you think? I did my DIY a bit different than Geneva from A Pair & a Spare did, so now you can choose from two types of this DIY haha! Are you gonna try it too? I'd love to see your results!!
X Saskia
FOLLOW ME ON: TWITTER | LOOKBOOK | BLOGLOVIN | INSTAGRAM
Wednesday, October 17, 2012
DIY Neon Necklace
Hi guys!
A couple of weeks ago, I bought a necklace in sale at H&M, but I never really wore it. It has a quite classy look, so it can make an outfit very neat. Then I thought about the neon trend taking over.. Why not give this necklace a little neon touch, to make it edgier and less neat? Well, that's what I did. I searched and searched for a neon spray paint (which I eventually found at Formido, a Dutch construction market) and then started spraying! Want to know how to create a necklace like this? Well then, here we go.
What you'll need
- Your necklace
- Spray paint
- Tape to cover the parts you don't want to spray
- Newspapers
- Hairspray
Follow these easy steps to create your neon necklace!
1. Cover the parts you don't want to color in tape. Make sure you don't see any bead directly next to the one you want to spray, to prevent these beads from being colored. You can just wrap some tape around the other beads, as we're also gonna cover this in a newspaper or anything else you'd like to use (an old towel / t-shirt / ...)

2. Go outside! You don't want to cover your entire house in neon. Put a newspaper underneath your necklace and the towel / t-shirt / extra newspaper over your necklace. Then start spraying. I sprayed about 3 layers on the beads.


3. Let it dry. You can spray some hairspray over the paint when it's completely dry, to seal your paint.
4. Wear it proudly! :-)


Of course you can also do this with any kind of object you'd like to spray. Personally, I'd love to spray the heel or toe caps of a pair of heels / flats / whatever type of shoe. Are you planning on doing a neon DIY? I'd love to know what you're gonna do and how it turned out! Of course you'll see any other neon DIY's from my hands as soon as they're completed ;-)
X Saskia
Follow me on: TWITTER | LOOKBOOK | BLOGLOVIN | INSTAGRAM
A couple of weeks ago, I bought a necklace in sale at H&M, but I never really wore it. It has a quite classy look, so it can make an outfit very neat. Then I thought about the neon trend taking over.. Why not give this necklace a little neon touch, to make it edgier and less neat? Well, that's what I did. I searched and searched for a neon spray paint (which I eventually found at Formido, a Dutch construction market) and then started spraying! Want to know how to create a necklace like this? Well then, here we go.
What you'll need
- Your necklace
- Spray paint
- Tape to cover the parts you don't want to spray
- Newspapers
- Hairspray
Follow these easy steps to create your neon necklace!
1. Cover the parts you don't want to color in tape. Make sure you don't see any bead directly next to the one you want to spray, to prevent these beads from being colored. You can just wrap some tape around the other beads, as we're also gonna cover this in a newspaper or anything else you'd like to use (an old towel / t-shirt / ...)
2. Go outside! You don't want to cover your entire house in neon. Put a newspaper underneath your necklace and the towel / t-shirt / extra newspaper over your necklace. Then start spraying. I sprayed about 3 layers on the beads.
3. Let it dry. You can spray some hairspray over the paint when it's completely dry, to seal your paint.
4. Wear it proudly! :-)
Of course you can also do this with any kind of object you'd like to spray. Personally, I'd love to spray the heel or toe caps of a pair of heels / flats / whatever type of shoe. Are you planning on doing a neon DIY? I'd love to know what you're gonna do and how it turned out! Of course you'll see any other neon DIY's from my hands as soon as they're completed ;-)
X Saskia
Follow me on: TWITTER | LOOKBOOK | BLOGLOVIN | INSTAGRAM
Tuesday, May 22, 2012
DIY Parrot Skirt
Hi guys!
I thought I deserved some relaxing moments after those 2 stressful days of final exams. History on Monday went really really bad, I can only hope for the best! Had maths today, I think it went OK, or at least I hope so haha! I'd rather not say if an exam went well or not, as it can only disappoint me if I won't get a very good result in the end :-P
Got my German exam tomorrow, don't have to study for it and neither do I have to study for the English exam which I've got on Thursday. Friday's the Latin exam. I guess it will be pretty tough and we have to study a lot for it, so I'm glad I've got German and English tomorrow and the day after so that I can spend all my time studying for my Latin exam!

 River Island blouse / DIY skirt / Texto heels
I made this skirt myself a couple of weeks ago. It only didn't work out very good, which you can't really see on the pics haha, so I decided to take pictures of it anyway. I'll try to create a skirt with a tropical print like this after my exams! Oooooh I can't wait until they're over!!
Oh I've got some very very very good news! I got accepted at the HKU in Utrecht to study Arts & Economics! Yay!! :-D :-D If I didn't have those stupid exams I would have gone out celebrating tonight!! If you're doing anything fun tonight or tomorrow night or maybe even in the weekend, will you celebrate a bit for me? ;-)
xo Saskia
I thought I deserved some relaxing moments after those 2 stressful days of final exams. History on Monday went really really bad, I can only hope for the best! Had maths today, I think it went OK, or at least I hope so haha! I'd rather not say if an exam went well or not, as it can only disappoint me if I won't get a very good result in the end :-P
Got my German exam tomorrow, don't have to study for it and neither do I have to study for the English exam which I've got on Thursday. Friday's the Latin exam. I guess it will be pretty tough and we have to study a lot for it, so I'm glad I've got German and English tomorrow and the day after so that I can spend all my time studying for my Latin exam!
I made this skirt myself a couple of weeks ago. It only didn't work out very good, which you can't really see on the pics haha, so I decided to take pictures of it anyway. I'll try to create a skirt with a tropical print like this after my exams! Oooooh I can't wait until they're over!!
Oh I've got some very very very good news! I got accepted at the HKU in Utrecht to study Arts & Economics! Yay!! :-D :-D If I didn't have those stupid exams I would have gone out celebrating tonight!! If you're doing anything fun tonight or tomorrow night or maybe even in the weekend, will you celebrate a bit for me? ;-)
xo Saskia
Friday, December 2, 2011
DIY Number One Heels

Ever wanted to be number one? Well, with these heels you can!! And how much will they cost? Let me tell you: they will cost you nothing! no-thing! That sounds appealing now, doesn't it?
You can creathe these babies yourself. What will you need?

- Two medals
- Chains
- Studs
- Needles and thread
- Studs
- Glue
- And it's possible to use a ribbon
When to use the ribbon?
When you want to wear your shoes with and without the decoration. If you put safety pins on the outsides of the ribbon, you can choose whether you want to wear your heels with your number one decoration! Plus, if you decide to create the decoration on a ribbon, you can put them on any shoe you want! You can even put one on a bag if you want to spice up your bag! :)
How to create these heels?
When you're using a ribbon, sew all the chains on the ribbon. When you're not using a ribbon, simply sew the chains on the shoe!

1. Measure how long the ribbon has to be to cover the entire front of the shoe

2. Pin the medal on the ribbon (or shoe) to see where it will look the prettiest. Try to put it as much as possible in the middle of the shoe. This will make your decoration the prettiest

3. Sew the chains on the ribbon (or shoe) the way you want them to be. Also glue the studs on the ribbon where you want. I decided to put the chains in the middle and finish it up with a stud on both sides. This is how your ribbon will look!

4. Put the safety pins on the ribbon and use these safety pins to secure the ribbon to the heel.

5. Follow the exact same steps on the other heel. Yay! Your pretty heels are all done! Now all you've got to do is put them on and wow everyone with your number one heels! :)
I hope you guys like this DIY! If you decide to do this yourself as well, don't hesitate to email me your results! I'd be happy to see your results!
Love xx,
Saskia
Wednesday, September 21, 2011
The Dress


This is the dress I promised you guys to show you today! I'll probably be wearing it tonight to the Fornarina event (missed that? Check the invite here!).
I'm so excited for tonight! Luckily I'm feeling good enough to go :) I'm really happy about it, because I've been looking forward to tonight for a long time! I'm still with my head up in the clouds about the Monki party I went to two weeks ago, and now I'm able to go to another party again! I feel so lucky right now!
Love xx
Saskia
Subscribe to:
Posts (Atom)